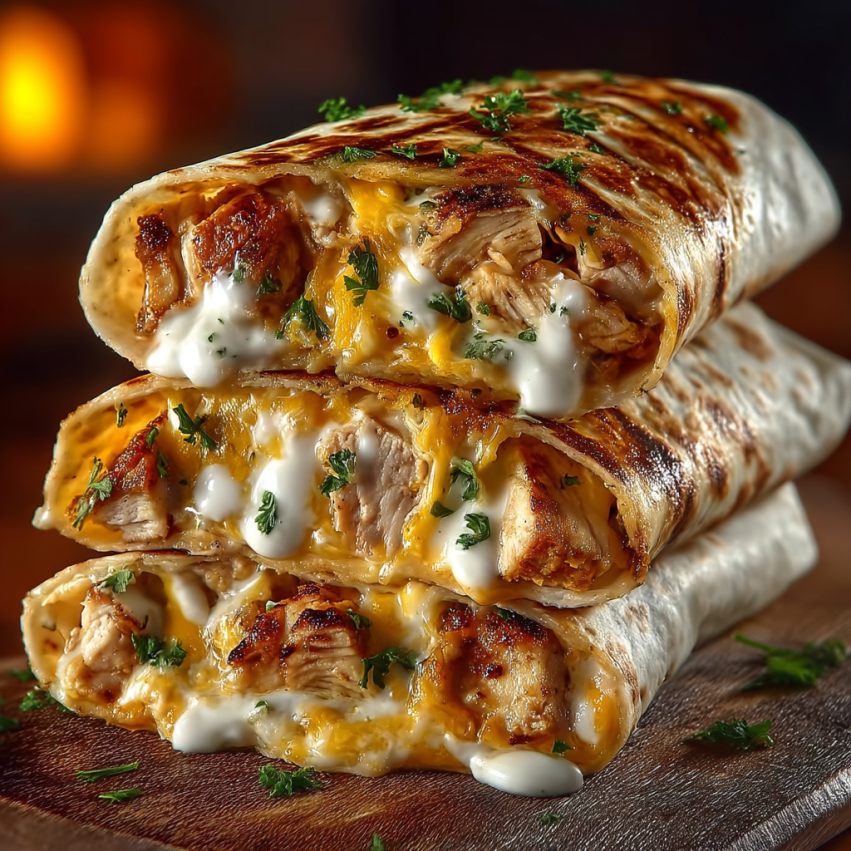
There’s something incredibly satisfying about a warm, crispy wrap filled with tender, garlicky chicken and melted cheese. I first made these Cheesy Garlic Chicken Wraps on a busy weeknight when I needed dinner on the table fast, and they’ve been a regular in my rotation ever since. The combination of perfectly seasoned chicken, creamy garlic sauce, and two types of cheese creates a flavor explosion that rivals any restaurant wrap. Plus, the golden, crispy exterior gives way to a warm, gooey center that’s absolutely irresistible.
What makes these wraps truly special is how they balance convenience with homemade goodness. Unlike takeout, you know exactly what’s going into them, and they’re ready in less than 30 minutes. Whether you’re feeding hungry teenagers, meal prepping for the week, or just craving something comforting and delicious, these wraps deliver every single time.
Why You’ll Love This Recipe
Quick and Easy: From start to finish, these wraps take less than 30 minutes to prepare. The simple seasoning blend transforms ordinary chicken into something extraordinary, while the assembly process is straightforward enough for beginners yet impressive enough for guests.
Budget-Friendly: Using basic pantry staples and affordable chicken breasts, this recipe feeds a family without breaking the bank. You probably already have most of the ingredients in your kitchen right now, which means fewer trips to the grocery store and more time enjoying your meal.
Incredibly Versatile: These wraps adapt beautifully to whatever you have on hand. Swap the cheeses, adjust the spice level, or add your favorite vegetables. They’re just as delicious for lunch as they are for dinner, and they reheat wonderfully for meal prep throughout the week.
Crowd-Pleaser: Kids and adults alike devour these wraps. The mild garlic flavor isn’t overwhelming, the cheese makes everything better, and that crispy exterior is downright addictive. I’ve served these at casual get-togethers, and they disappear within minutes every time.
Ingredients
For the Chicken
- 2 large chicken breasts, diced into bite-sized pieces
- 1 tablespoon olive oil
- 2 teaspoons garlic powder
- 1 teaspoon onion powder
- 1 teaspoon paprika
- Salt and black pepper, to taste
For the Filling & Assembly
- 1 cup shredded cheddar cheese
- 1/2 cup shredded mozzarella cheese
- 4 large flour tortillas
- 1/2 cup creamy garlic sauce
- Fresh parsley, chopped (for garnish)
Step-by-Step Instructions
Preparing the Chicken
Start by gathering all your ingredients before you begin cooking. In a large bowl, combine your diced chicken with olive oil, ensuring each piece gets a light coating. This helps the seasonings stick better and promotes even browning during cooking.
Next, add the garlic powder, onion powder, paprika, salt, and black pepper directly to the bowl. Using your hands or a large spoon, mix everything thoroughly so the chicken is evenly coated with all those wonderful spices. Don’t rush this step—taking an extra minute here ensures every bite is flavorful.
Cooking the Chicken
Heat a large skillet over medium heat and give it a minute to warm up properly. Once hot, add your seasoned chicken in a single layer. Avoid the temptation to overcrowd the pan, as this can cause the chicken to steam rather than brown.
Cook the chicken for 6–8 minutes, stirring occasionally to ensure even cooking on all sides. You’re looking for a beautiful golden color and an internal temperature of 165°F. The paprika will give the chicken a gorgeous hue, while the garlic and onion powders create an irresistible aroma that’ll have everyone asking when dinner’s ready.
Assembling Your Wraps
While the chicken cools slightly, lay out your four tortillas on a clean work surface. Spread about 2 tablespoons of creamy garlic sauce over each tortilla, making sure to leave a 1-inch border around the edges. This border is crucial—it prevents the sauce from squeezing out when you roll the wraps.
Place an equal portion of the cooked chicken in the center of each tortilla, creating a horizontal line of filling. Then comes the best part: generously top each portion with cheddar and mozzarella cheese. The combination of these two cheeses creates the perfect melt and flavor balance.
Rolling Technique
Folding the wraps correctly ensures they stay together during cooking. Start by folding the bottom edge of the tortilla up and over the filling, tucking it snugly underneath. Then, fold in both sides like you’re wrapping a present, creating neat edges.
Finally, roll the wrap tightly from bottom to top, keeping constant pressure to prevent any gaps. The tighter you roll, the better the wrap will hold together when you cook it. Set each completed wrap seam side down while you finish the others.
Achieving the Perfect Crisp
Heat a clean skillet over medium heat—there’s no need to add oil since the tortillas will crisp up beautifully on their own. Place your wraps seam side down in the pan, which helps seal them shut as they cook.
Cook for 2–3 minutes on the first side until you see that gorgeous golden-brown color developing. Carefully flip each wrap and cook for another 2–3 minutes on the other side. You’ll know they’re ready when the cheese inside is melted and gooey, and the outside is perfectly crispy.
Serving Suggestions
These Cheesy Garlic Chicken Wraps are fantastic on their own, but pairing them with the right sides takes them to the next level. Serve them with a crisp garden salad dressed with a light vinaigrette to balance the richness of the cheese. Alternatively, crispy sweet potato fries or regular fries make an excellent companion for a more indulgent meal.
For dipping sauces, consider offering ranch dressing, extra garlic sauce, or even a spicy sriracha mayo for those who like a kick. A simple side of fresh salsa or pico de gallo adds a refreshing brightness that cuts through the richness beautifully.
If you’re serving these for a casual gathering, slice each wrap diagonally and arrange them on a platter with toothpicks. This presentation makes them perfect for sharing and looks impressively restaurant-worthy. Don’t forget to garnish with that chopped fresh parsley—it adds a pop of color and a hint of freshness that really completes the dish.
Recipe Variations
Spicy Chicken Version
For heat lovers, add 1 teaspoon of cayenne pepper or chili powder to your chicken seasoning blend. You can also mix some hot sauce into the garlic sauce or add sliced jalapeños to the filling. The cheese helps temper the heat while still letting those spicy flavors shine through.
Veggie-Loaded Wraps
Boost the nutrition by adding sautéed bell peppers, onions, and mushrooms to the filling. Cook these vegetables in the same skillet after the chicken, using those flavorful browned bits left behind. You can also add fresh spinach or arugula before rolling for extra greens without any cooking required.
Different Cheese Combinations
While cheddar and mozzarella are classic, feel free to experiment with other cheeses. Pepper jack adds a nice kick, while Monterey Jack keeps things mild. Cream cheese mixed into the garlic sauce creates an extra creamy filling, and a sprinkle of Parmesan on the outside before cooking adds a delicious savory crust.
Low-Carb Alternative
Swap the flour tortillas for low-carb wraps or large lettuce leaves for a lighter option. You can also use cauliflower wraps, which crisp up nicely when cooked. These alternatives work particularly well if you’re watching your carb intake but still want all those amazing flavors.
Make-Ahead Tips
These wraps are perfect for meal prep, which is honestly one of my favorite things about them. You can prepare the chicken up to 3 days in advance and store it in an airtight container in the refrigerator. When you’re ready to eat, simply reheat it gently in a skillet before assembling your wraps.
For even faster assembly, you can prepare the wraps completely but skip the final crisping step. Store them wrapped individually in plastic wrap or foil in the refrigerator for up to 2 days. When hunger strikes, just unwrap and cook them in a skillet until crispy and heated through.
If you want to freeze them, assemble the wraps completely and wrap each one tightly in plastic wrap, then place them in a freezer bag. They’ll keep for up to 2 months in the freezer. To reheat, let them thaw in the refrigerator overnight, then cook them in a skillet as directed. You can also reheat them from frozen by using lower heat and covering the pan for the first few minutes to help them warm through evenly.
The garlic sauce can be made ahead and stored in the refrigerator for up to a week. Similarly, you can shred your cheese in advance and keep it ready to go. These small prep steps make throwing together dinner on a busy night incredibly quick and stress-free.
Notas
Temperature Matters: Always let your chicken cool for about 5 minutes before assembling the wraps. Hot chicken will make the cheese melt too quickly and can cause the tortillas to tear, making them difficult to roll properly. This short cooling period makes a huge difference in the final result.
Tortilla Selection: Use room temperature tortillas rather than cold ones straight from the refrigerator. Cold tortillas are more likely to crack when you fold them. If yours are cold, warm them slightly in the microwave for 10–15 seconds wrapped in a damp paper towel.
Even Cooking: Don’t overcrowd your skillet when cooking either the chicken or the wraps. Working in batches ensures proper browning and crisping. If everything is crammed together, you’ll end up with soggy, steamed results rather than that delicious golden exterior.
Sauce Distribution: Spreading the garlic sauce all the way to the edges might seem logical, but it actually makes the wraps harder to seal and messier to eat. That 1-inch border really does make a difference in keeping everything contained.
Seam Side Down: Always start cooking your wraps seam side down. The heat seals the edge closed, preventing them from unraveling during cooking. This simple technique ensures your wraps stay intact from pan to plate.
Frequently Asked Questions
Can I use chicken thighs instead of breasts?
Absolutely! Chicken thighs actually work wonderfully in this recipe and tend to be even more flavorful and juicy. They also cost less, which is a nice bonus. Just make sure to dice them to the same size as you would the breasts for even cooking. The cooking time remains the same—just check that internal temperature of 165°F.
What’s the best garlic sauce to use?
Any creamy garlic sauce works beautifully here. Store-bought options like Kraft Garlic Aioli or Primal Kitchen Garlic Aioli are convenient and delicious. You can also make your own by mixing mayonnaise with minced garlic, lemon juice, and a pinch of salt. Some people love using Caesar dressing as well, which adds a nice tangy dimension to the wraps.
How do I prevent my wraps from getting soggy?
The key is letting the chicken cool slightly before assembly and not overloading the wraps with sauce or ingredients. Additionally, cooking the assembled wraps immediately rather than letting them sit helps maintain that crispy texture. If you’re meal prepping, store the components separately and assemble just before eating.
Can I make these in an air fryer?
Yes! Air fryers work fantastic for these wraps. Preheat your air fryer to 375°F, lightly spray the wraps with cooking spray, and cook for 5–6 minutes, flipping halfway through. They come out incredibly crispy with less oil than pan-frying, though I personally love the control and golden color you get from a skillet.
What if I don’t have paprika?
No problem at all! You can substitute with a bit more garlic powder, some Italian seasoning, or even a pinch of cumin for a different flavor profile. The paprika mainly adds color and a subtle sweetness, so your wraps will still taste delicious without it. I’ve made them without it plenty of times when my spice cabinet was running low.
How do I reheat leftover wraps?
For the best results, reheat them in a skillet over medium heat for 2–3 minutes per side. This restores that crispy exterior while warming the filling through. You can also use an air fryer at 350°F for 3–4 minutes. The microwave works in a pinch, but you’ll lose the crispiness—wrap them in a paper towel and heat for 1–2 minutes, flipping halfway through.
Can I add vegetables to the wraps?
Definitely! Sautéed bell peppers, onions, and mushrooms are popular additions. Just cook them separately and let them cool before adding to prevent excess moisture. Fresh additions like lettuce, tomatoes, or avocado also work great—just add them after cooking the wrap so they stay crisp and fresh.