There’s something magical about Halloween baking that brings out the kid in all of us. Every October, my kitchen transforms into a spooky bakery, and these Mummy Brownies have become my signature treat. The first time I made them for a Halloween party, they disappeared within minutes—kids and adults alike couldn’t resist their adorable spookiness.
What started as a fun experiment has turned into an annual tradition in my home. Now, my family requests them weeks before Halloween even arrives! The combination of rich, fudgy brownies wrapped in sweet white chocolate “bandages” creates a treat that’s both delicious and delightfully creepy.
Why You’ll Love This Mummy Brownies Recipe
Simple enough for beginners: Using a boxed brownie mix as your base means anyone can make these, regardless of baking experience. Even if you’ve never decorated desserts before, the mummy design is forgiving and fun.
Perfect for parties: These individual brownies are ideal for Halloween gatherings, school parties, or trick-or-treat alternatives. Each guest gets their own adorable mummy, making serving a breeze.
Kid-friendly activity: Getting children involved in the decorating process creates lasting memories. They’ll love piping the white chocolate “bandages” and placing those googly candy eyes.
Customizable sweetness: By starting with your favorite brownie mix, you control the chocolate intensity. Additionally, you can adjust how much white chocolate you use based on your sweetness preference.
Make-ahead friendly: Brownies taste even better the next day, making these a stress-free option for busy Halloween hosts. You can prepare components in advance and assemble when ready.
Ingredients You’ll Need
For the Brownies
- 1 box brownie mix (plus ingredients listed on package – typically eggs, oil, and water)
- Cooking spray or parchment paper for pan preparation
For the Mummy Decoration
- 1 cup white chocolate chips or white candy melts
- 1 tube black gel icing
- Mini candy eyes (approximately 24-36 pieces, depending on brownie yield)
Optional Add-ins
- 1/2 teaspoon espresso powder (to enhance chocolate flavor)
- 1/2 cup chocolate chips (for extra fudginess)
How to Make Mummy Brownies
Step 1: Prepare Your Brownies
Start by preheating your oven according to the brownie mix package directions, usually around 350°F. Meanwhile, prepare your baking pan by either greasing it thoroughly with cooking spray or lining it with parchment paper for easy removal.
Mix the brownie batter following the package instructions exactly. For an extra-rich flavor, consider adding a pinch of espresso powder to the dry mix—it intensifies the chocolate without adding coffee taste.
Step 2: Bake and Cool
Pour the prepared batter into your pan, spreading it evenly to ensure uniform baking. Slide the pan into your preheated oven and bake according to package timing, typically 20-30 minutes depending on your pan size.
Test for doneness by inserting a toothpick into the center; it should come out with just a few moist crumbs attached. Overbaking will result in dry brownies, so watch carefully during the final minutes.
Once baked, remove the pan from the oven and let it cool completely on a wire rack. This step is crucial—decorating warm brownies will cause the white chocolate to melt and slide off.
Step 3: Cut into Rectangles
After your brownies have cooled completely (at least 2 hours), use a sharp knife to cut them into equal-sized rectangles. For cleaner cuts, wipe your knife between slices.
Rectangles work best for the mummy shape, mimicking a wrapped figure. Aim for pieces about 2 inches by 3 inches, though exact size doesn’t matter as much as consistency.
Step 4: Melt the White Chocolate
Place your white chocolate chips or candy melts in a microwave-safe bowl. Heat in 20-second intervals, stirring thoroughly between each round to prevent scorching.
Continue this process until the chocolate is completely smooth and pourable. If the mixture seems too thick, add a tiny bit of vegetable oil (about 1/2 teaspoon) to thin it slightly.
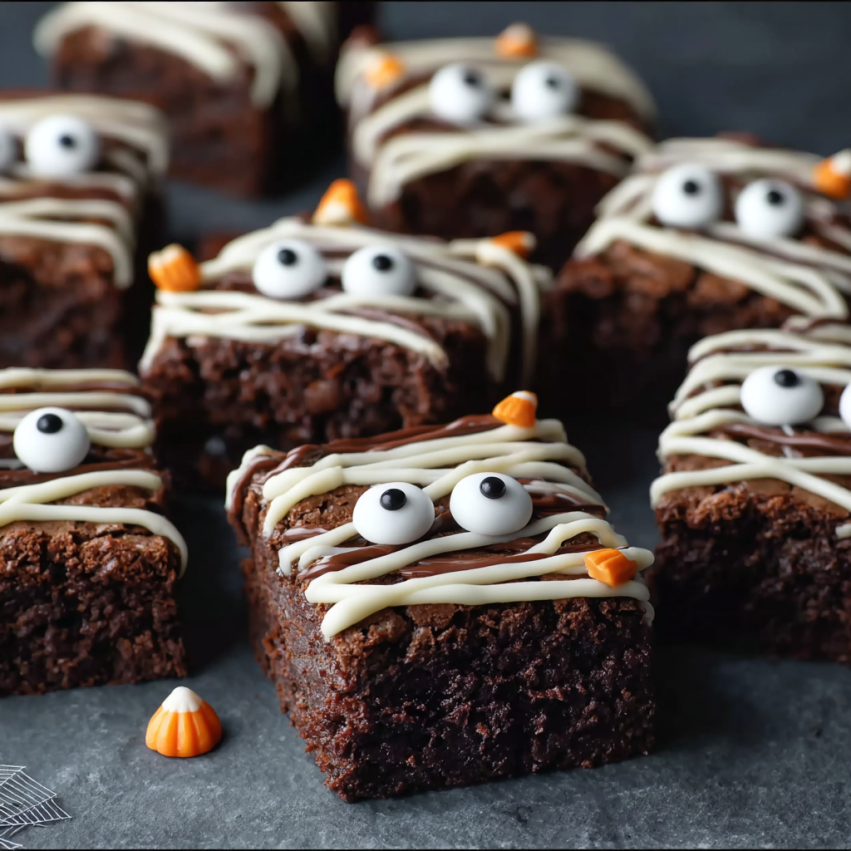
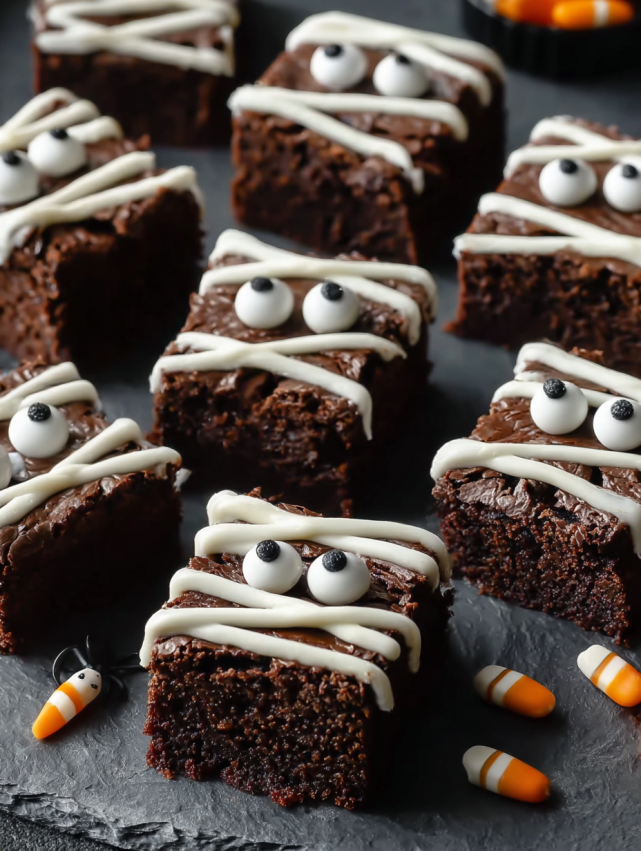
Step 5: Create the Mummy Bandages
Transfer the melted white chocolate to a piping bag, squeeze bottle, or even a plastic sandwich bag with a small corner snipped off. Working with one brownie at a time, drizzle the white chocolate in random diagonal lines across the surface.
Create a crisscross pattern that resembles wrapped bandages, leaving some gaps to show the chocolate brownie underneath. Don’t worry about perfection—mummies should look a bit haphazard and ancient!
Leave a small open space near the top third of each brownie for the mummy’s “face.”
Step 6: Add the Eyes and Details
While the white chocolate is still wet and tacky, gently press two mini candy eyes into the open space you left on each brownie. Position them close together for a cuter look, or space them wider for a sillier expression.
If desired, use your black gel icing to add tiny pupils to the candy eyes for extra detail. You can also add a few dots below the eyes to suggest a mouth, though keeping it simple often works best.
Allow the white chocolate to set completely before moving the brownies. This usually takes about 30 minutes at room temperature, or 10-15 minutes in the refrigerator.
Serving Suggestions
These Mummy Brownies shine as the centerpiece of any Halloween dessert table. Arrange them on a black or orange platter surrounded by plastic spiders, fake cobwebs, or candy corn for maximum spooky effect.
For individual servings at parties, place each brownie on a small square of black or orange tissue paper. This not only looks festive but also makes grabbing one easier for guests.
Pair these brownies with a glass of cold milk, hot apple cider, or even a pumpkin spice latte for adults. The rich chocolate brownie base complements warm fall beverages beautifully.
Consider creating a “monster dessert board” featuring these mummies alongside other Halloween treats like spider cookies, ghost meringues, or candy-filled caramel apples.
Recipe Variations to Try
Peanut Butter Mummies
Swirl 1/3 cup of peanut butter into the brownie batter before baking. The nutty flavor pairs wonderfully with the white chocolate coating. Alternatively, use peanut butter chips instead of white chocolate for the bandages.
Dark Chocolate Drizzle
After the white chocolate sets, add thin drizzles of melted dark chocolate over the bandages for a sophisticated look. This also adds depth to the overall chocolate experience.
Mint Mummies
Add 1/2 teaspoon of peppermint extract to the white chocolate before piping. The refreshing mint flavor creates a delightful contrast with the rich brownie base.
Gluten-Free Version
Simply substitute your regular brownie mix with a gluten-free version. Most brands bake up just as fudgy and delicious, making this treat accessible to guests with dietary restrictions.
Homemade Brownie Base
If you prefer baking from scratch, use your favorite homemade brownie recipe instead of a mix. Rich, fudgy brownies work better than cakey ones for this application.
Colorful Mummies
Divide the white chocolate into separate bowls and tint with food coloring. Create green Frankenstein mummies, orange pumpkin mummies, or purple monster mummies for variety.
Make-Ahead Tips
Bake brownies in advance: Prepare and bake your brownies up to 2 days before decorating. Store them uncut in an airtight container at room temperature, and they’ll stay fresh and fudgy.
Pre-cut for efficiency: Cut your brownies into rectangles the night before your party. Cover them tightly with plastic wrap to prevent drying out until you’re ready to decorate.
Decorated storage: Once fully decorated and set, these mummies keep well for 3-4 days in an airtight container at room temperature. Layer them between sheets of parchment paper to prevent sticking.
Freezer-friendly: Undecorated brownies freeze beautifully for up to 3 months. Wrap individual pieces in plastic wrap, then place in a freezer bag. Thaw at room temperature before decorating.
Batch decoration: If making a large quantity, set up an assembly line. Melt extra white chocolate as needed, and recruit helpers to place eyes while you pipe the bandages.
Notas (Important Notes)
Chocolate quality matters: While candy melts work perfectly fine, high-quality white chocolate chips provide better flavor. Ghirardelli and Lindt are excellent choices if you want to elevate the taste.
Eye alternatives: Can’t find candy eyes? Use mini M&Ms, chocolate chips, or even cut small circles from black licorice. You can also pipe eyes directly with black icing for a completely edible option.
Pan size affects baking time: The brownie package typically suggests different times for different pan sizes. An 8×8-inch pan creates thicker brownies, while a 9×13-inch pan yields thinner ones—both work great for mummies.
Temperature is key: Brownies must be completely cool before decorating, but your white chocolate should still be warm and fluid. Reheating the chocolate slightly if it starts to thicken will make piping easier.
Clean cuts: For the neatest brownie edges, use a plastic knife or clean your metal knife with hot water between cuts. This prevents the brownies from sticking and creating jagged edges.

Frequently Asked Questions
Can I use dark or milk chocolate instead of white chocolate? Absolutely! While white chocolate creates the classic mummy bandage look, you can certainly use milk or dark chocolate if you prefer. The contrast against the dark brownie won’t be as striking, but they’ll still taste delicious. For a fun twist, try using a combination of white and milk chocolate to create a two-toned bandage effect.
How do I prevent the white chocolate from cracking when I cut the brownies? The key is to decorate after cutting, not before. By cutting your brownies into rectangles first, then adding the white chocolate decoration to individual pieces, you avoid any cracking issues altogether. This method also gives you more control over the design on each piece.
What if I don’t have a piping bag? No problem at all! A plastic sandwich bag works perfectly as a substitute. Simply spoon the melted white chocolate into the bag, seal it, and snip off a tiny corner. You can also use a spoon to drizzle the chocolate in a back-and-forth motion, though this gives slightly less control over the pattern.
Can I make these nut-free for school parties? Yes! Most brownie mixes are nut-free, but always check the label to be sure. Make certain all your ingredients, including the white chocolate and candy eyes, are produced in nut-free facilities if you’re serving someone with severe allergies. Betty Crocker and Duncan Hines both offer nut-free brownie mix options.
Why is my white chocolate seizing or becoming clumpy? White chocolate is sensitive to moisture and temperature. Even a drop of water can cause it to seize and become grainy. Make sure your bowl is completely dry before melting, and heat in short intervals, stirring gently. If it does seize, try adding a small amount of vegetable oil or shortening and stirring vigorously—sometimes you can save it.
How long do these brownies stay fresh? When stored properly in an airtight container, Mummy Brownies stay fresh for 3-4 days at room temperature. However, in my experience, they rarely last that long! The brownies might actually taste even better on day two as the flavors meld together.
Can I transport these to a party? Definitely! Once the white chocolate has fully set (which takes about 30 minutes), these brownies are quite sturdy. Layer them in a container with parchment paper between layers, and they’ll travel beautifully. Just avoid leaving them in a hot car, as the white chocolate can soften in heat.
What’s the best brownie mix to use? This comes down to personal preference. Ghirardelli creates incredibly fudgy brownies with deep chocolate flavor, though it’s pricier. Duncan Hines and Betty Crocker both make reliable boxes that produce consistent results. For extra decadence, look for mixes labeled “fudge” rather than “cake-style.”