There’s something magical about seeing kids’ faces light up when they spot these adorable mummy hot dogs at a Halloween party. I first made these little wrapped wonders for my daughter’s school celebration three years ago, and they became an instant legend among the other parents. Now, every October, I get messages asking when I’ll be making “those mummy things” again. They’re ridiculously simple to prepare, yet they never fail to steal the show at any spooky gathering.
What makes these hot dog mummies so special is their perfect balance of fun and flavor. While they look like you spent hours creating intricate decorations, the reality is much simpler. In fact, you can have a whole tray ready in under 30 minutes from start to finish.
Why You’ll Love This Recipe
It’s incredibly kid-friendly. Children absolutely adore these mummies, both for eating and for helping to make them. The wrapping process becomes a fun activity that keeps little hands busy before the party even starts. Additionally, there’s no scary factor here—just cute, cartoonish mummies that even the youngest party guests will enjoy.
Minimal ingredients, maximum impact. You only need a handful of pantry staples to create these show-stoppers. There’s no need for specialty equipment or hard-to-find ingredients. Most importantly, the puff pastry does all the heavy lifting, creating beautiful golden layers without any effort on your part.
They’re surprisingly versatile. While hot dogs are the classic choice, you can easily swap them for various alternatives. Vegetarian sausages work wonderfully, as do cheese sticks for a meat-free option. Furthermore, the recipe scales beautifully whether you’re feeding six people or sixty.
Perfect make-ahead party food. These mummies can be prepared several hours in advance and reheated just before serving. This flexibility means less stress when you’re hosting and more time to enjoy the festivities with your guests.
Ingredients You’ll Need
Main Components
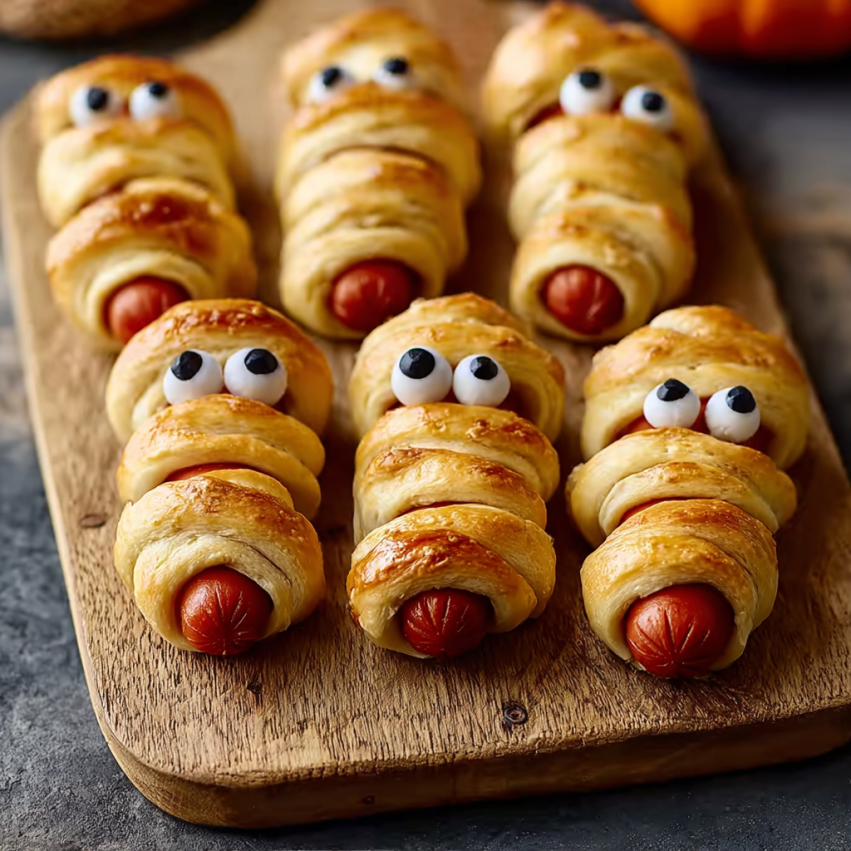
- 12 hot dogs – Choose smaller cocktail-sized hot dogs (about 4 inches or 11 cm) for the best results. They’re easier to wrap and perfect for party portions
- 1 puff pastry sheet – Ready-rolled variety works perfectly (10 ounces/275 grams). Look for all-butter versions for the richest flavor
- 24 tiny edible sugar eyes – These bring your mummies to life. You can find them in the baking aisle near cake decorations
- 1 teaspoon mayonnaise – Acts as edible “glue” for the eyes. It’s flavorless once applied and holds better than water
- Mustard or ketchup – Alternative for attaching eyes or for serving alongside your mummies
Optional Additions
- Everything bagel seasoning – Sprinkle on the pastry before wrapping for extra flavor
- Sesame seeds – Adds a nice texture to the mummy bandages
- Fresh herbs – Tiny parsley sprigs make fun “hair” for your mummies
Step-by-Step Instructions
Preparing Your Workspace
First, preheat your oven to 350°F (175°C) and line a baking sheet with parchment paper. This prevents sticking and makes cleanup effortless. Next, gather all your ingredients and tools so everything is within easy reach during assembly.
Cooking the Hot Dogs
Place your hot dogs in a medium saucepan and cover them completely with cold water. Bring the water to a rolling boil over high heat, then immediately reduce the temperature to medium-low. Let the hot dogs simmer gently for about 5 minutes until they’re heated through and slightly plumped.
Meanwhile, prepare a plate lined with paper towels. Once the hot dogs are ready, drain them in a colander and transfer them to the paper towels. Pat them thoroughly dry—this step is crucial because any moisture will prevent the pastry from adhering properly.
Creating the Mummy Wraps
Unroll your puff pastry sheet on a clean cutting board. Using a sharp knife or pizza cutter, slice the pastry lengthwise into 12 thin strips, each about half an inch wide. Don’t worry if they’re not perfectly uniform; irregular “bandages” actually look more authentic.
Take one pastry strip and begin wrapping it around a hot dog at a slight diagonal angle. Leave a small gap near the top where the eyes will go—this is your mummy’s face. Continue wrapping, allowing small spaces between each layer to create the bandaged effect. The pastry will expand during baking, so don’t wrap too tightly.
Assembly Tips
Press the ends of each pastry strip gently to secure them against the hot dog. If a strip isn’t long enough to cover the entire hot dog, simply overlap a second strip and continue wrapping. Conversely, if you have excess pastry, just trim it off or tuck the end underneath.
Arrange your wrapped mummies on the prepared baking sheet, spacing them about an inch apart. This allows air to circulate and ensures even browning on all sides.
Baking to Perfection
Slide the baking sheet into your preheated oven and bake for 10-12 minutes. Watch for the pastry to turn a beautiful golden brown color. The layers should puff up nicely and become flaky. However, avoid overbaking, as this can dry out the hot dogs.
Remove the tray from the oven and let the mummies cool for about 2 minutes. While they’re still warm, use a tiny dab of mayonnaise on the back of each sugar eye and press two eyes onto each mummy’s face. The gentle warmth helps the mayo set quickly without melting the sugar eyes.
Serving Suggestions
These hot dog mummies shine as a centerpiece on your Halloween buffet table. Arrange them on a large platter lined with black or orange tissue paper for dramatic effect. Place small bowls of ketchup and mustard around the platter for dipping.
For an extra spooky presentation, serve them on a “graveyard” made from a cutting board covered with green herb garnish as “grass.” Add pretzel stick “tombstones” with funny epitaphs written in food-safe markers. Your guests will love the attention to detail.
Party Pairing Ideas
Serve these mummies alongside other Halloween favorites like “witch finger” breadsticks, “monster” deviled eggs, or a bubbling punch bowl with dry ice. They also pair wonderfully with simple sides like carrot sticks and ranch dip or a Caesar salad for a more substantial meal.
Recipe Variations
Cheese Mummies
Replace hot dogs with string cheese sticks for a vegetarian version. Mozzarella sticks work beautifully and create a gooey, melty center. Just reduce the baking time by 2-3 minutes since cheese doesn’t need pre-cooking like hot dogs do.
Mini Mummies
Use cocktail wieners instead of full-size hot dogs for bite-sized appetizers. You’ll need to cut your pastry strips thinner and shorter. These miniature versions are perfect for younger children and disappear quickly at parties.
Spicy Mummies
Wrap spicy sausages or jalapeño cheese hot dogs for an adult-friendly twist. Brush the pastry with a mixture of melted butter and hot sauce before baking. Your grown-up guests will appreciate the kick.
Breakfast Mummies
Transform this into a morning treat by wrapping breakfast sausages instead. Serve them with maple syrup for dipping. It’s a fun way to make Halloween morning special for kids.
Gourmet Mummies
Use high-quality artisan sausages and brush the pastry with beaten egg before baking for extra shine. Sprinkle with poppy seeds or caraway seeds for a sophisticated touch that works for adult gatherings.
Make-Ahead Tips
You can prepare these mummies several hours before your party, which significantly reduces last-minute stress. Wrap the hot dogs with pastry and arrange them on the baking sheet, then cover tightly with plastic wrap and refrigerate for up to 4 hours before baking.
Alternatively, you can fully bake the mummies up to 6 hours ahead. Let them cool completely, then store them in an airtight container at room temperature. Reheat in a 300°F oven for 5-7 minutes just before serving to restore their crispiness.
Freezing Instructions
These mummies freeze surprisingly well. After baking and cooling completely, place them in a single layer on a baking sheet and freeze until solid. Transfer to a freezer-safe container with parchment paper between layers. They’ll keep for up to 2 months.
To reheat from frozen, place them on a baking sheet and warm in a 325°F oven for 12-15 minutes until heated through and crispy. Don’t microwave them, as this makes the pastry soggy rather than flaky.
Notas
Pastry selection matters. Puff pastry creates the lightest, flakiest results, but crescent roll dough works in a pinch for a more bread-like texture. Just be aware that crescent dough browns faster, so watch your baking time carefully.
Eye placement timing is key. Always attach the eyes while the mummies are still slightly warm. If you wait until they’re completely cool, the mayo won’t adhere properly, and your eyes will slide right off during transport.
Customize for dietary needs. These easily adapt to various dietary restrictions. Use gluten-free puff pastry and certified gluten-free hot dogs for celiac-friendly versions. Turkey or chicken hot dogs work perfectly for those avoiding beef or pork.
Storage tips. Leftover mummies should be refrigerated within 2 hours of baking. Store them in an airtight container in the fridge for up to 3 days. The pastry won’t be as crispy after refrigeration, but reheating in the oven helps restore some texture.
Nutrition Information (Per Mummy)
- Calories: 248
- Fat: 19g
- Carbohydrates: 12g
- Protein: 7g
Keep in mind that nutritional values vary depending on the specific brands you use. Turkey hot dogs and reduced-fat pastry can lower the calorie and fat content significantly if you’re looking for lighter options.
Frequently Asked Questions
Can I use regular hot dogs instead of cocktail-sized ones?
Absolutely! Standard hot dogs work perfectly fine, though you’ll need longer and wider pastry strips to wrap them. You might also want to cut full-size hot dogs in half to create more manageable portions, especially if you’re serving younger children. The wrapping technique remains exactly the same regardless of size.
What if I can’t find edible sugar eyes?
No worries—you have several creative alternatives. Small dots of mustard or ketchup create simple but effective eyes. Alternatively, use black sesame seeds, small pieces of black olives, or even tiny chocolate chips. Some people draw eyes on with food-safe markers after baking, which gives you complete control over your mummies’ expressions.
Why is my pastry getting soggy?
The most common culprit is moisture from the hot dogs. Make absolutely sure you’re patting them completely dry after boiling. Additionally, don’t wrap the pastry too tightly, as this traps steam inside. Finally, serve the mummies within a few hours of baking for the crispiest results.
Can kids help make these?
These are fantastic for little helpers! Children as young as five can wrap the pastry strips around hot dogs with supervision. Older kids can handle the cutting and arranging independently. Just keep them away from the hot oven, and let them have fun with the creative part of attaching the eyes.
How do I transport these to a party?
The best method is to bake them at home, let them cool completely, and transport in a covered container. Reheat them at your destination if possible. If you must transport them warm, place them in a single layer in a container with paper towels underneath to absorb any condensation. Never stack warm mummies, as the bottom ones will get soggy.
What’s the best dipping sauce?
Classic ketchup and mustard are always crowd-pleasers, but don’t be afraid to get creative. Honey mustard adds a sweet-tangy flavor, while BBQ sauce gives a smoky depth. For adults, try sriracha mayo or a spicy aioli. Kids often enjoy ranch dressing or even marinara sauce for dipping.
Can I make these ahead and freeze the unbaked mummies?
Yes! Wrap the hot dogs with pastry, place them on a parchment-lined baking sheet, and freeze until solid. Transfer to a freezer bag and freeze for up to 1 month. When ready to serve, bake directly from frozen, adding 3-5 minutes to the cooking time. This is perfect for party prep weeks in advance.