I’ll never forget the first time I served this at a Halloween party. My friends walked in, saw the deep red drizzles cascading over the popcorn, and immediately grabbed their phones for pictures. They thought it was just a prop until someone brave enough took a bite and declared it the best thing at the party. Since then, this Bloody Red Velvet Popcorn has become my signature spooky season snack, disappearing within minutes every single time.
There’s something wonderfully theatrical about food that looks creepy but tastes incredible. This recipe nails that balance perfectly, combining the beloved flavor of red velvet with the satisfying crunch of popcorn and a dramatic presentation that’s pure Halloween magic.
Why You’ll Love This Bloody Red Velvet Popcorn
It’s ridiculously easy to make. Even if you’ve never made flavored popcorn before, this recipe requires just three main ingredients and about 15 minutes of your time. There’s no complicated candy-making or temperature-taking involved, which means less stress and more time to enjoy the spooky festivities.
The flavor combination is absolutely addictive. Red velvet isn’t just about the color—it has a subtle cocoa flavor with hints of vanilla that transforms ordinary popcorn into something special. When you add that sweet, slightly tart “bloody” drizzle, each handful delivers the perfect balance of chocolatey richness and fruity brightness.
Your presentation will wow everyone. Whether you’re hosting a Halloween movie marathon, preparing treats for trick-or-treaters, or bringing something to a costume party, this popcorn makes a statement. The crimson drizzles look genuinely eerie, especially when you serve it in clear bags or bowls where guests can see the full effect.
Perfect for Any Spooky Occasion
This recipe scales beautifully for any gathering size. I’ve made small batches for cozy movie nights with my family and multiplied it for neighborhood Halloween parties serving 50 people. Either way, the process stays simple and the results remain consistently impressive.
It’s actually fun to make with kids. My nieces and nephews love helping with this recipe because it feels like an edible craft project. They get excited about the drizzling part, creating their own “blood splatter” patterns. Just be prepared—things might get a little messy, but that’s half the fun.
Ingredients You’ll Need
Main Components
- 10 cups popped popcorn – Use plain, unsalted popcorn as your base (I prefer air-popped, but microwave works great too)
- 1/2 cup red velvet chocolate melts – These specialty melts give you that signature red velvet flavor
- 1/4 cup red syrup – Grenadine provides the best “bloody” effect with its deep red color, though red icing works as an alternative
Equipment Essentials
You’ll need a large baking sheet, parchment paper, a microwave-safe bowl, and a spoon for drizzling. Having a second spoon or spatula for tossing helps distribute the chocolate evenly.
How to Make Bloody Red Velvet Popcorn
Step 1: Prepare Your Workspace
Spread the 10 cups of popped popcorn on a parchment-lined baking sheet. Make sure to remove any unpopped kernels—nobody wants to bite into those while enjoying this treat! Spreading the popcorn in a single layer as much as possible helps ensure even coating later.
Step 2: Melt the Red Velvet Chocolate
Place the red velvet chocolate melts in a microwave-safe bowl. Microwave in 30-second intervals, stirring thoroughly between each burst. This gentle approach prevents scorching and keeps the chocolate smooth. The melts should be completely fluid and glossy when ready, typically taking about 1 to 1.5 minutes total.
Step 3: Coat the Popcorn
Drizzle the melted red velvet chocolate over the popcorn using a spoon. Work quickly while the chocolate is still warm and fluid. Gently stir and toss the popcorn with a large spoon or your hands (if the chocolate has cooled slightly) to coat evenly. You don’t need every single piece covered—some variation actually adds to the rustic, homemade charm.
Step 4: Add the Bloody Drizzle
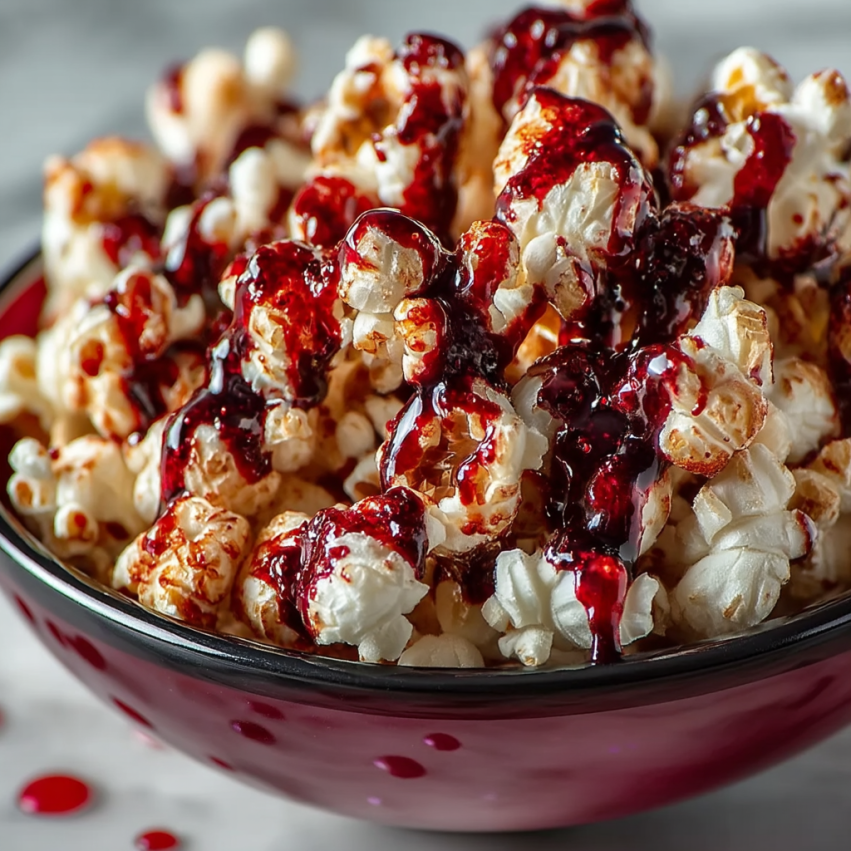
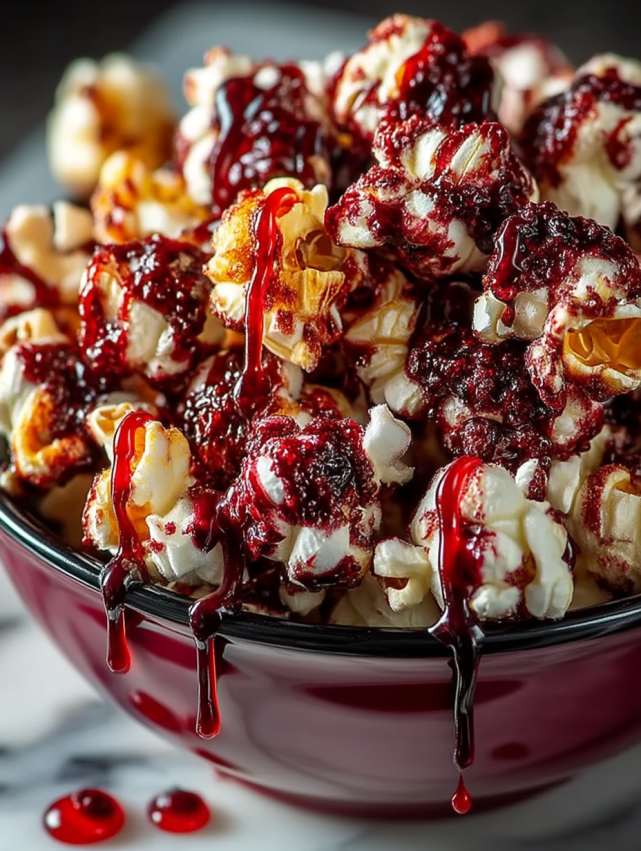
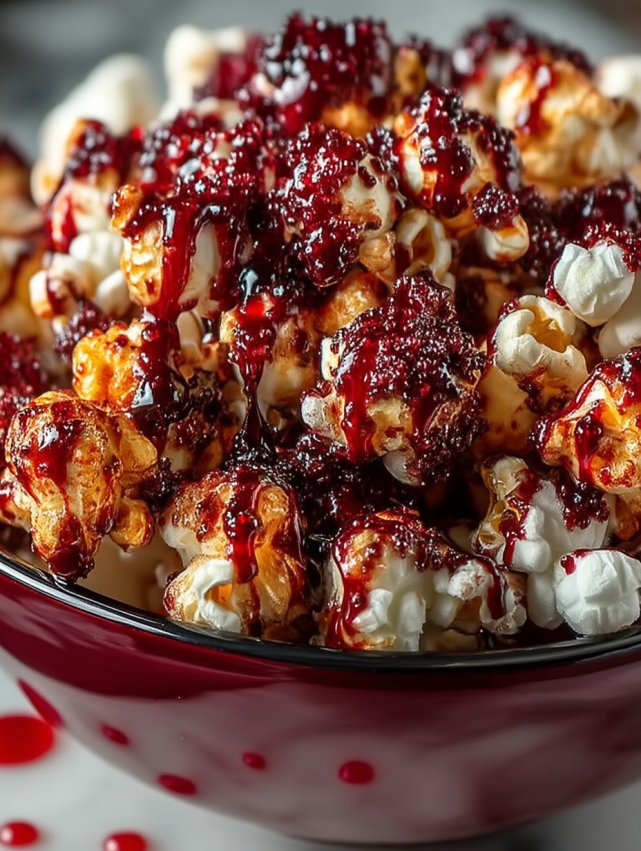
Here comes the dramatic part! Drizzle the red syrup over the chocolate-coated popcorn in random patterns. For maximum spooky effect, let it drip and pool in some areas rather than distributing it evenly. Think of it as creating an edible crime scene. The contrast between the darker red velvet chocolate and the brighter red syrup creates that perfect “bloody” appearance.
Step 5: Let It Set
Allow the chocolate to set completely before serving, which typically takes about 15-20 minutes at room temperature. If you’re in a hurry, pop the baking sheet in the refrigerator for about 10 minutes to speed up the process. Once set, break apart any large clumps and transfer to your serving bowl or storage container.
Serving Suggestions
This Bloody Red Velvet Popcorn shines brightest when served in clear containers that show off its gory glory. Mason jars, clear cellophane bags tied with black ribbon, or glass bowls all work beautifully for presentation.
Creative Serving Ideas
Create a spooky snack bar by serving this popcorn alongside other Halloween treats. I like to set out small paper bags or boxes so guests can mix and match their favorites. The popcorn pairs wonderfully with candy corn, chocolate-covered pretzels, and gummy worms for a complete Halloween spread.
For parties, consider making individual portions in clear cups. Add a plastic spider on top or a label that says “Zombie Snacks” or “Vampire Bites.” These personal servings prevent double-dipping and make great party favors that guests can take home.
Beverage Pairings
This sweet, chocolatey popcorn pairs beautifully with cold milk, hot apple cider, or even a Halloween punch. The slight saltiness of the popcorn base balances nicely with these drinks, making it a satisfying snack that doesn’t feel too heavy.
Recipe Variations to Try
White Chocolate “Mummy Wrap” Version
Substitute white chocolate melts for the red velvet chocolate and drizzle sparingly to create a mummy-wrapped effect. Add candy eyes before the chocolate sets for an extra creepy touch. This variation is perfect if you want something that looks spooky but has a milder, sweeter flavor profile.
Dark Chocolate “Vampire Bite” Edition
Use dark chocolate instead of red velvet melts for a more intense, grown-up flavor. The dark chocolate provides a richer, less sweet base that lets the fruity red syrup really shine through. This version has become my personal favorite for adult Halloween gatherings.
Extra Decadent Double Chocolate
Mix in 1/4 cup of mini chocolate chips or cacao nibs before adding the red velvet coating. This adds extra crunch and chocolate intensity. The different textures create a more complex eating experience that chocolate lovers will absolutely adore.
Peanut Butter Twist
Melt 2 tablespoons of peanut butter with the red velvet chocolate for a PB&J-inspired flavor combination. The peanut butter adds richness and makes the popcorn even more addictive. Just be sure to check for peanut allergies if serving at parties.
Color Variations for Other Holidays
Don’t limit this recipe to Halloween! Use pink candy melts and raspberry syrup for Valentine’s Day, or green candy melts with lime syrup for St. Patrick’s Day. The basic technique works year-round with different color schemes.
Make-Ahead Tips
This popcorn stores surprisingly well, making it perfect for busy party prep. Once completely set, store it in an airtight container at room temperature for up to 3 days. However, I’ll be honest—it rarely lasts that long in my house!
Storing for Maximum Freshness
The key to keeping your Bloody Red Velvet Popcorn crispy is moisture control. Make sure the popcorn is completely dry before coating, and ensure the chocolate has fully set before storing. Any residual moisture will make the popcorn soggy. If you live in a humid climate, adding a silica gel packet to your storage container helps maintain crispness.
Advance Preparation Strategy
You can pop the popcorn up to 24 hours ahead and store it in an airtight container. However, add the chocolate coating and syrup drizzle no more than 6-8 hours before serving for the best texture and appearance. The syrup can begin to absorb into the popcorn if left too long, diminishing that dramatic bloody effect.
Freezing Not Recommended
While some coated popcorns freeze well, I don’t recommend freezing this particular recipe. The syrup doesn’t handle freezing and thawing gracefully, and the popcorn can become chewy rather than crispy. Since it’s so quick to make, I always prepare it fresh.
Notes and Pro Tips
Choose your popcorn wisely. Air-popped popcorn gives you the lightest, crispiest base, but microwave popcorn works in a pinch. If using microwave popcorn, choose the “lightly salted” variety rather than butter-flavored, which can interfere with the chocolate coating.
Temperature matters for drizzling. If your chocolate or syrup is too hot, it will make the popcorn soggy. Conversely, if the chocolate is too cool, it won’t drizzle smoothly. Let the melted chocolate cool for about 30 seconds after removing from the microwave before drizzling. This brief cooling period gives you the perfect consistency for coating without compromising the popcorn’s crunch.
Don’t skip the parchment paper. It makes cleanup infinitely easier and prevents sticking. Trying to scrape hardened chocolate and syrup off a baking sheet is nobody’s idea of fun. Trust me, I learned this lesson the hard way during my first attempt.
Layer your drizzles strategically. For the most dramatic bloody effect, concentrate your red syrup drizzle on one side or in specific areas rather than distributing it evenly. This creates pools and streaks that look more authentically gory.
Work in batches for large quantities. If you’re making multiple batches for a big party, prepare them separately rather than trying to coat a massive amount at once. Coating works best when you can toss and mix effectively, which becomes difficult with too much volume.
Frequently Asked Questions
Can I use regular chocolate chips instead of candy melts?
Absolutely! However, regular chocolate chips require a different melting approach. Add 1 teaspoon of coconut oil or shortening per cup of chocolate chips to help them melt smoothly and achieve a good drizzling consistency. Candy melts are formulated to melt easily and set quickly, but chocolate chips with a bit of oil work nearly as well.
Where can I find red velvet chocolate melts?
Most craft stores like Michaels or Hobby Lobby carry them in the baking section, especially during fall. Wilton makes a popular brand that’s widely available. You can also order them online from Amazon or specialty baking websites. In a pinch, mix regular chocolate melts with a tiny drop of red food coloring and 1/4 teaspoon of cocoa powder to mimic the flavor.
What if my grenadine is too thin and runs off the popcorn?
This happens sometimes, especially with certain brands of grenadine. To thicken it slightly, simmer the grenadine in a small saucepan for 2-3 minutes to reduce it by about a third. Let it cool before drizzling. Alternatively, mix 1 tablespoon of light corn syrup into your grenadine for better cling without changing the color.
Is this recipe suitable for kids?
Yes! Despite the spooky appearance, there’s nothing in this recipe that’s inappropriate for children. The “blood” is just sweetened syrup, and the red velvet flavor is mild and chocolatey. Kids typically love both making and eating this treat. Just supervise younger children during the melting and drizzling steps to prevent burns.
Can I make this without a microwave?
Definitely. Melt the red velvet chocolate using a double boiler on the stove instead. Place the chocolate in a heat-safe bowl over a pot of simmering water, stirring until smooth. This method actually gives you more control over the temperature, though it takes a bit longer.
How do I prevent the popcorn from getting soggy?
The main culprit of soggy popcorn is too much liquid or coating applied while too hot. Let the chocolate cool slightly before drizzling, use the syrup sparingly, and ensure your popcorn is completely fresh and dry before starting. Stale popcorn absorbs moisture more readily, so always begin with freshly popped kernels.
Can I add food coloring to make it even redder?
You can, though I find it’s usually unnecessary with red velvet melts and grenadine. If you do add coloring, use gel food coloring rather than liquid, as liquid can affect the chocolate’s consistency. Add just a tiny amount—a little goes a long way, and too much can make the chocolate seize up.
What’s the best way to package this as gifts?
Clear cellophane bags work beautifully for gift-giving. Fill the bags with popcorn, tie them with Halloween-themed ribbon, and attach a small tag. For a more upscale presentation, use mason jars with decorative lids or small Halloween-themed buckets from the dollar store. The visual impact of seeing the bloody drizzles through clear packaging is half the appeal!