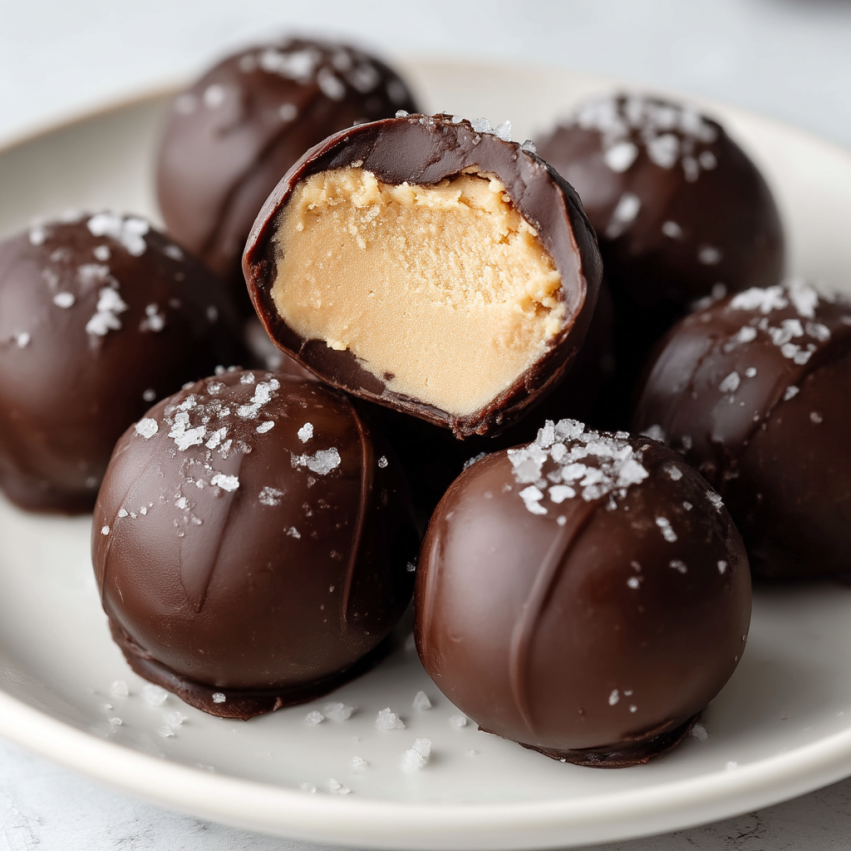
There’s something magical about finding a snack that feels like dessert but actually fuels your body. I first made these frozen yogurt bites on a sweltering summer afternoon when I was craving something sweet but didn’t want to derail my healthy eating goals. After one bite, I was completely hooked! The creamy peanut butter center paired with the rich dark chocolate coating creates the perfect balance of indulgence and nutrition.
Now, these little treats have become a staple in my freezer. Whether I need a post-workout snack, an afternoon pick-me-up, or a guilt-free dessert, these protein-packed bites always hit the spot. They’re so simple to make that even my kids can help, and honestly, they disappear faster than I can make them!
Why You’ll Love This Recipe
These frozen peanut butter Greek yogurt bites are about to become your new favorite healthy snack. First and foremost, they’re incredibly protein-rich, with Greek yogurt and peanut butter delivering a satisfying nutritional punch that keeps you full and energized. Unlike store-bought treats loaded with artificial ingredients, you’ll know exactly what goes into each bite.
Additionally, the recipe comes together in less than 30 minutes of active time. The ingredient list is refreshingly short, requiring just a handful of pantry staples you probably already have on hand. What’s more, these bites are completely customizable—you can adjust the sweetness, swap the nut butter, or even change up the chocolate coating to suit your preferences.
The texture is another reason to love them. That creamy, frozen yogurt center contrasts beautifully with the crisp chocolate shell, creating a satisfying bite every single time. Plus, they’re portion-controlled, making it easy to enjoy a treat without overdoing it. Best of all, they’re freezer-friendly, so you can make a batch and have healthy snacks ready whenever a craving strikes.
Ingredients You’ll Need
For the Yogurt Mixture:
- 1/2 cup Greek yogurt (full fat) – The base that provides creaminess and protein
- 1/4 cup powdered peanut butter (like PB Fit, PB2, or similar brands) – Adds peanut flavor without excess oil
- 1 tablespoon creamy peanut butter – Enhances richness and authentic peanut butter taste
- 1/2 tablespoon maple syrup – Natural sweetener that balances the tanginess
For the Chocolate Coating:
- 1/2 cup dark chocolate chips (such as Lily’s) – Creates that irresistible chocolate shell
- 1 teaspoon coconut oil – Helps the chocolate melt smoothly and sets with a nice shine
- Flaky sea salt for topping (optional) – Adds a gourmet touch and enhances the chocolate flavor
Serving Suggestions:
This recipe yields approximately 6 generously sized bites, perfect for meal prep or sharing (though you might not want to!). Enjoy them straight from the freezer for a firm, ice cream-like texture, or let them sit at room temperature for 2-3 minutes if you prefer a slightly softer bite.
Step-by-Step Instructions
Step 1: Prepare the Yogurt Mixture
Begin by gathering your mixing bowl and measuring out all the ingredients for the yogurt base. In the bowl, combine 1/2 cup of full-fat Greek yogurt with 1/4 cup of powdered peanut butter. The powdered version is key here because it provides intense peanut flavor while keeping the mixture thick enough to scoop.
Next, add 1 tablespoon of creamy peanut butter to bring richness and authentic peanut butter taste to the mix. Drizzle in 1/2 tablespoon of maple syrup for just the right amount of sweetness. Using a sturdy spoon or spatula, stir everything together vigorously until the mixture becomes completely smooth and uniform. You’ll know it’s ready when there are no streaks of yogurt or clumps of peanut butter powder remaining.
Step 2: Form and Freeze the Bites
Prepare a clean plate or small baking tray by lining it with parchment paper. This prevents the bites from sticking and makes cleanup a breeze. Grab a medium cookie scoop or a regular spoon—a cookie scoop works best for creating uniform portions, but a spoon will work just fine.
Scoop the yogurt mixture onto the parchment-lined surface, spacing them about an inch apart. Try to make each portion roughly the same size so they freeze and coat evenly. This recipe should yield around 6 bites, depending on your scoop size. Transfer the tray to your freezer immediately and let the bites chill for 10-20 minutes. They’re ready when they feel solid to the touch and hold their shape when gently pressed.
Step 3: Melt the Chocolate for Coating
While your yogurt bites firm up in the freezer, it’s time to prepare the chocolate coating. Measure out 1/2 cup of dark chocolate chips and place them in a microwave-safe bowl. Add 1 teaspoon of coconut oil to the chocolate—this creates a smoother consistency and helps the chocolate set with a beautiful glossy finish.
Microwave the mixture in 20-30 second intervals, stirring thoroughly between each round to prevent burning. Alternatively, you can use a double boiler for more controlled melting. Continue heating and stirring until the chocolate becomes completely smooth and liquid with no lumps remaining. The coconut oil will make the chocolate more fluid, making it easier to coat each bite evenly.
Step 4: Dip and Set the Chocolate-Coated Bites
Once your yogurt bites are firm and your chocolate is perfectly melted, you’re ready for the fun part. Remove the frozen bites from the freezer, working quickly to prevent them from softening too much. Using a fork or your fingers, dip each bite into the melted chocolate, turning it to ensure complete coverage.
Let any excess chocolate drip back into the bowl before placing the coated bite back on the parchment paper. If desired, immediately sprinkle a pinch of flaky sea salt on top of each bite before the chocolate sets. This optional step adds a sophisticated sweet-and-salty contrast that really elevates the flavor. Transfer the chocolate-coated bites to the refrigerator and let them chill for about 15-20 minutes until the chocolate shell hardens completely.
Step 5: Serve and Store
After the chocolate has fully set, your protein-packed treats are ready to devour! These frozen yogurt bites are best enjoyed straight from the fridge or freezer, where they maintain their perfect texture. The cold temperature keeps the yogurt center creamy while the chocolate stays crisp and snappy.
For storage, keep the bites in an airtight container in the refrigerator for 3-4 days, or store them in the freezer for up to 2 weeks. If freezing, separate layers with parchment paper to prevent sticking. Simply grab one (or two!) whenever you need a quick protein boost or a satisfying sweet treat.
Creative Serving Ideas
These versatile bites work beautifully in so many situations. Enjoy them as a post-workout snack to replenish your energy and satisfy your muscles’ protein needs. They also make an excellent afternoon pick-me-up when you’re fighting that 3 p.m. slump and need something to power through the rest of your day.
Serve them as a healthier dessert option at dinner parties—guests will be amazed that something so delicious is actually good for them! Pack them in lunchboxes for a special treat that won’t melt by midday (especially if you include a small ice pack). Furthermore, they’re perfect for satisfying late-night sweet cravings without the guilt that typically comes with midnight snacking.
For a fun presentation, arrange them on a pretty plate with fresh berries and a drizzle of extra melted peanut butter. You can also crumble one over a smoothie bowl for added texture and protein, or enjoy them alongside your morning coffee as a protein-rich breakfast component.
Delicious Recipe Variations
Almond Butter Version: Swap the peanut butter for almond butter (both powdered and creamy) for a different nutty flavor profile. Almonds pair especially well with dark chocolate and create a more subtle, sophisticated taste.
White Chocolate Drizzle: After the dark chocolate sets, melt a small amount of white chocolate and drizzle it over the top for an elegant, bakery-style appearance. The visual contrast makes them look extra special for gatherings.
Protein Powder Boost: Add a scoop of your favorite vanilla or chocolate protein powder to the yogurt mixture for an even bigger protein punch. This works especially well if you’re using these as post-workout recovery snacks.
Crunchy Addition: Fold in some chopped peanuts or granola before forming the bites for added texture and crunch. The contrast between smooth and crunchy takes these treats to another level.
Berry Swirl: Gently fold in a tablespoon of berry jam or fresh mashed berries before scooping for a fruity twist. Strawberry and raspberry both complement peanut butter beautifully.
Coconut Coating: After dipping in chocolate, immediately roll the bites in shredded coconut for a tropical variation. This creates a bounty bar-inspired version that’s absolutely divine.
Make-Ahead Tips
These frozen yogurt bites are incredibly meal-prep friendly, making them perfect for batch cooking. Double or triple the recipe on a Sunday afternoon and you’ll have healthy snacks ready for the entire week. The bites freeze exceptionally well, maintaining their texture and flavor for up to two weeks in the freezer.
When preparing multiple batches, consider using a mini muffin tin lined with paper liners instead of scooping onto a tray. This method creates perfectly uniform bites and makes it easier to remove them once frozen. After the initial freeze, transfer them to a freezer-safe container or zip-top bag, separating layers with parchment paper.
For the best results, freeze the yogurt bites before coating them in chocolate rather than freezing the chocolate-coated versions. The chocolate may develop a slight bloom (white streaks) if frozen, though this doesn’t affect taste. If you prefer pristine-looking treats, coat only the amount you’ll eat within a few days and keep uncoated frozen bites ready for fresh coating as needed.
Important Notes
Yogurt Selection: Full-fat Greek yogurt works best for this recipe because it creates a creamier, richer texture that freezes beautifully. Low-fat or non-fat versions tend to freeze harder and have a less pleasant mouthfeel, though they will work in a pinch.
Chocolate Quality: Using high-quality dark chocolate makes a noticeable difference in both taste and texture. Sugar-free options like Lily’s work wonderfully if you’re watching your sugar intake, but any dark chocolate chips you enjoy will be delicious.
Freezing Time: Don’t skip the initial freeze before coating! If the yogurt bites aren’t completely solid, they’ll fall apart when you try to dip them in chocolate. However, avoid over-freezing them into rock-hard pucks, as this makes dipping more difficult.
Working Quickly: The yogurt bites will start to soften at room temperature, so work efficiently when coating them in chocolate. If you notice them getting too soft, pop them back in the freezer for 5 minutes before continuing.
Sweetness Adjustments: The maple syrup provides subtle sweetness, but you can adjust this to taste. If you prefer sweeter treats, increase to 1 tablespoon of maple syrup, or use honey as an alternative. For less sweetness, reduce it to 1 teaspoon or omit it entirely—the dark chocolate coating adds plenty of sweetness.
Frequently Asked Questions
Can I use regular peanut butter instead of powdered?
While you can technically use only regular peanut butter, the mixture will be much thinner and harder to scoop into bite-sized portions. Powdered peanut butter is essential for achieving the right consistency. If you absolutely must substitute, you’d need to significantly increase the amount of Greek yogurt and possibly add a thickener, though results may vary.
How long do these really last in the freezer?
These bites stay fresh in the freezer for up to two weeks when stored properly in an airtight container. Beyond that point, they’re still safe to eat but may develop freezer burn or ice crystals that affect the texture. For the best taste and consistency, try to enjoy them within the first week.
Can I make these dairy-free?
Absolutely! Substitute the Greek yogurt with a thick, dairy-free alternative like coconut yogurt or cashew yogurt. Make sure whatever you choose is thick and creamy rather than liquidy. Use dairy-free chocolate chips for the coating, and you’ll have a completely plant-based treat that’s just as delicious.
Why is my chocolate coating cracking when I bite into them?
This usually happens when there’s too much temperature difference between the frozen yogurt and the room where you’re storing them. Try letting the chocolate-coated bites sit at room temperature for just 2-3 minutes before eating, or store them in the refrigerator rather than the freezer for a softer chocolate shell.
Can I skip the coconut oil in the chocolate?
You can skip it, but the coconut oil helps create a smoother, thinner chocolate coating that’s easier to work with and creates a more professional-looking finish. Without it, the chocolate will be thicker and may not coat as evenly. If you don’t have coconut oil, a tiny bit of butter or shortening works as an alternative.
Are these actually high in protein?
Yes! Each bite contains approximately 4-5 grams of protein, primarily from the Greek yogurt and peanut butter. While that might not sound like a huge amount, it’s impressive for a treat that feels like dessert. Eating 2-3 bites gives you a solid protein boost comparable to a protein bar.
Can kids help make these?
Definitely! This is a wonderfully kid-friendly recipe. Children can help mix the yogurt mixture, scoop the bites, and even sprinkle the sea salt. Just keep the chocolate-dipping step for adults or older kids to avoid burns from the hot melted chocolate.
What if I don’t have a cookie scoop?
No problem at all! A regular tablespoon works perfectly fine. You can also use your hands to roll the mixture into balls if it’s firm enough, though this can get a bit messy. The key is just making them roughly the same size so they freeze evenly.