There’s something incredibly satisfying about a warm, melty wrap that pulls apart with strings of cheese. I discovered this recipe on a busy weeknight when I had leftover rotisserie chicken and needed dinner on the table fast. My family devoured these wraps so quickly that they’ve become our go-to meal whenever we crave something comforting but don’t want to spend hours in the kitchen. The combination of tender chicken, creamy garlic aioli, and gooey cheddar creates a flavor explosion that rivals any restaurant wrap.
Why You’ll Love This Recipe
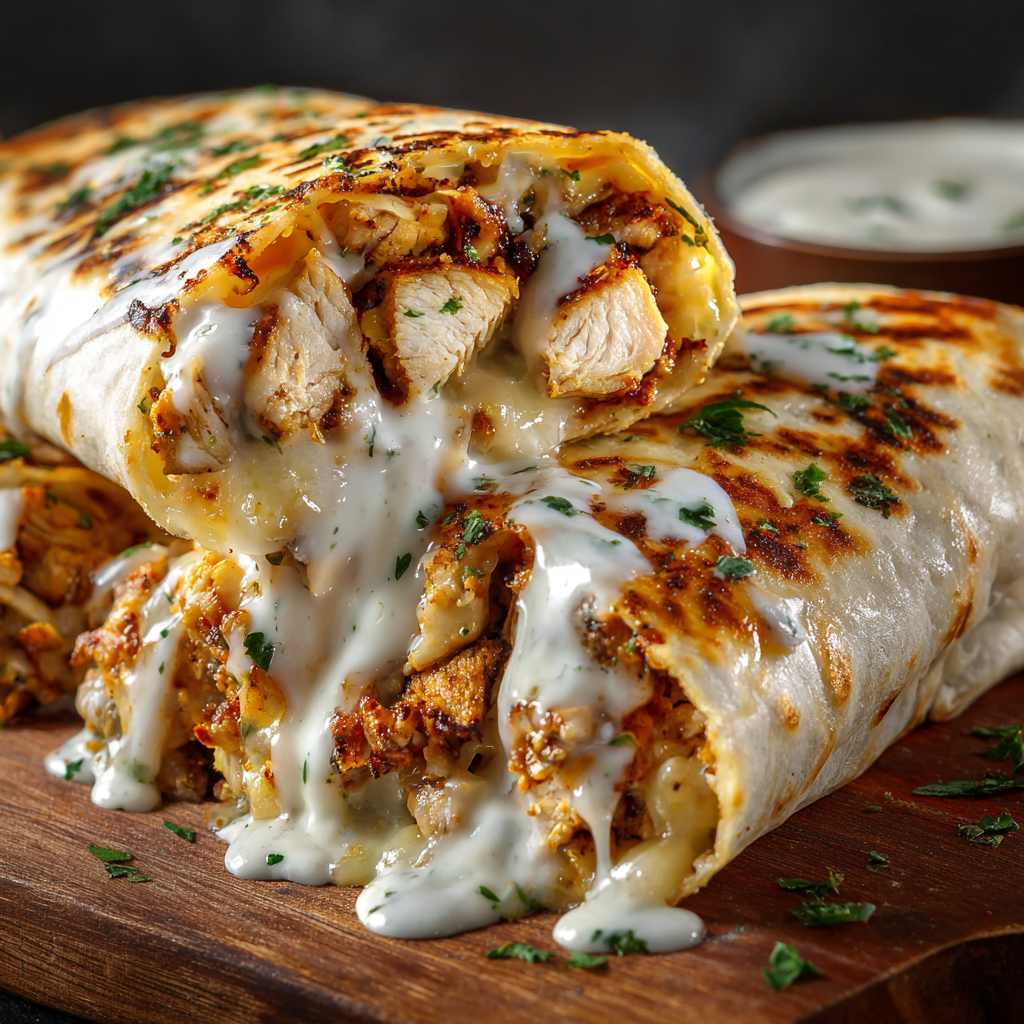
These Cheesy Garlic Chicken Wraps are the ultimate comfort food that comes together in less than 20 minutes. First, they’re incredibly versatile—you can use leftover chicken, rotisserie chicken, or even meal-prepped chicken breasts. The garlic aioli adds a rich, creamy element that binds everything together while delivering bold flavor in every bite. Additionally, the wraps are customizable to your preferences, making them perfect for picky eaters or adventurous food lovers alike.
Beyond their delicious taste, these wraps are also budget-friendly and practical. You probably already have most of the ingredients in your kitchen, which means less time shopping and more time enjoying your meal. The recipe scales beautifully whether you’re cooking for one or feeding a crowd. Plus, the grilling step creates a crispy, golden exterior that contrasts perfectly with the warm, melty cheese inside.
Ingredients
Main Components
- 2 cups cooked chicken (shredded)
- 1/2 cup garlic aioli
- 1 cup cheddar cheese (shredded)
- 4 large tortillas
- Salt and pepper to taste
Optional Serving Suggestions
- Fresh lettuce or spinach
- Sliced tomatoes
- Diced red onions
- Pickled jalapeños
- Sour cream or ranch dressing for dipping
- Fresh cilantro for garnish
Step-by-Step Instructions
Preparing the Chicken Mixture
Start by placing your shredded chicken in a medium-sized mixing bowl. If you’re using rotisserie chicken, make sure to remove any skin and bones first. Add the garlic aioli to the bowl, then use a fork or spoon to combine everything thoroughly. The aioli should coat every piece of chicken evenly, creating a creamy, flavorful base. Season generously with salt and pepper, tasting as you go to achieve your preferred level of seasoning.
Assembling Your Wraps
Lay out your tortillas on a clean work surface. For easier wrapping, you can warm them slightly in the microwave for about 10-15 seconds—this makes them more pliable and less likely to tear. Spoon about 1/2 cup of the chicken mixture into the center of each tortilla, spreading it horizontally across the middle. Then, sprinkle 1/4 cup of shredded cheddar cheese over the chicken, distributing it evenly for consistent melty goodness in every bite.
Folding Technique
To fold your wrap properly, start by folding in the left and right sides of the tortilla about 2 inches toward the center. Next, fold the bottom edge up and over the filling, tucking it tightly as you roll. Continue rolling away from you, keeping the sides tucked in as you go. The key is to roll firmly but not so tight that the filling squeezes out the ends.
Grilling to Perfection
Heat a large skillet or griddle over medium heat—avoid going too hot or the outside will burn before the cheese melts. Place your wraps seam-side down in the pan, which helps seal them closed. Cook for 2-3 minutes until the bottom develops a golden-brown crust and beautiful grill marks appear. Carefully flip each wrap using a spatula, then cook for another 2-3 minutes on the other side. You’ll know they’re ready when the cheese has melted completely and both sides are crispy and golden.
Serving Your Wraps
Remove the wraps from the heat and let them rest for about a minute before slicing. This brief resting period allows the cheese to set slightly, preventing it from oozing out when you cut. Slice each wrap diagonally in half or into thirds for easier handling. Serve immediately while they’re still warm and the cheese is at its gooiest.
Serving Suggestions
These wraps shine on their own, but pairing them with complementary sides elevates the entire meal. A simple side salad with a tangy vinaigrette cuts through the richness of the cheese and aioli beautifully. Alternatively, crispy sweet potato fries or regular French fries make for a satisfying, indulgent combination that kids and adults alike will love.
For a lighter option, serve the wraps with fresh vegetable sticks like carrots, celery, and bell peppers. You can also offer dipping sauces on the side—ranch dressing, extra garlic aioli, or even a spicy chipotle mayo add variety and let everyone customize their experience. If you’re hosting a casual gathering, cut the wraps into pinwheels and serve them as appetizers alongside your favorite dips.
Recipe Variations
Spicy Southwest Version
Transform these wraps into a Southwest-inspired meal by adding taco seasoning to the chicken mixture. Mix in black beans, corn, and diced bell peppers for extra texture and nutrition. Swap the cheddar for pepper jack cheese to bring some heat, then top with fresh cilantro, a squeeze of lime, and a dollop of sour cream.
Italian-Style Twist
Give your wraps an Italian makeover by using mozzarella cheese instead of cheddar and adding sun-dried tomatoes and fresh basil to the chicken mixture. Replace half of the garlic aioli with pesto for a vibrant, herbaceous flavor. Finish with a sprinkle of Parmesan cheese before grilling for an extra savory crust.
Buffalo Chicken Wraps
For buffalo chicken lovers, toss the shredded chicken with buffalo sauce before mixing it with the aioli (use less aioli to avoid making it too saucy). Add crumbled blue cheese or ranch dressing, along with diced celery for crunch. These wraps deliver all the flavors of buffalo wings in a convenient, handheld format.
Veggie-Loaded Version
Bulk up your wraps with extra vegetables for added nutrition and crunch. Shredded lettuce, diced tomatoes, sliced avocado, and thinly sliced red onions all work wonderfully. You can also add roasted red peppers or sautéed mushrooms for deeper, more complex flavors that complement the chicken and cheese.
Make-Ahead Tips
These wraps are fantastic for meal prep and can save you valuable time during busy weeks. You can prepare the chicken and aioli mixture up to 3 days in advance and store it in an airtight container in the refrigerator. When you’re ready to eat, simply assemble and grill the wraps fresh—this ensures the tortillas stay crispy rather than soggy.
If you want to prep the entire wrap ahead of time, assemble them completely but don’t grill them yet. Wrap each one tightly in plastic wrap or aluminum foil and refrigerate for up to 24 hours. When you’re ready to serve, remove the wrapping and grill as directed. The wraps may need an extra minute or two on the heat since they’re starting cold.
For longer storage, you can freeze assembled (but ungrilled) wraps. Wrap each one individually in plastic wrap, then place them all in a freezer-safe bag. They’ll keep for up to 2 months in the freezer. To cook from frozen, let them thaw in the refrigerator overnight, then grill as usual. Alternatively, you can grill them directly from frozen—just use lower heat and allow extra cooking time to ensure the center heats through completely.
Notes
Chicken Options: Rotisserie chicken is the quickest option and adds extra flavor since it’s already seasoned. However, you can also use leftover grilled chicken, poached chicken breasts, or even meal-prepped chicken thighs. For the best texture, shred the chicken by hand rather than chopping it—shredded pieces integrate better with the aioli and create a more cohesive filling.
Tortilla Selection: Large burrito-size flour tortillas work best for these wraps because they’re sturdy enough to hold the filling without tearing. If you prefer a healthier option, whole wheat or spinach tortillas are excellent substitutes. Corn tortillas are too small and tend to break when folded, so they’re not recommended for this recipe.
Cheese Variations: While cheddar is classic and melts beautifully, feel free to experiment with other cheeses. Monterey Jack, Colby Jack, or a Mexican cheese blend all work wonderfully. For a sharper flavor, try aged white cheddar. You can even mix two different cheeses for more complex flavor profiles.
Aioli Alternatives: If you don’t have garlic aioli on hand, you can make a quick substitute by mixing regular mayonnaise with minced garlic and a squeeze of lemon juice. Greek yogurt mixed with garlic powder also works as a lighter alternative, though it creates a tangier flavor profile.
Storage: Grilled wraps are best enjoyed immediately for optimal texture. However, if you have leftovers, wrap them in foil and refrigerate for up to 2 days. Reheat in a 350°F oven for about 10 minutes or in a skillet over medium-low heat until warmed through. Avoid microwaving if possible, as it can make the tortilla soggy.
Nutrition Information (per serving)
- Calories: 450
- Fat: 18g
- Saturated Fat: 7g
- Cholesterol: 90mg
- Sodium: 800mg
- Carbohydrates: 40g
- Fiber: 3g
- Sugar: 3g
- Protein: 35g
Frequently Asked Questions
Can I make these wraps without grilling them?
Absolutely! While grilling creates a crispy exterior and helps seal the wrap, you can enjoy them cold or simply warm them in the microwave for 30-45 seconds. The cheese won’t be as melty and the tortilla won’t be crispy, but they’ll still taste delicious—perfect for a quick lunch on the go.
What’s the best way to prevent the wraps from getting soggy?
The key is not overloading the wrap with too much aioli or adding watery vegetables like tomatoes directly into the filling before grilling. If you want to add fresh vegetables, place them on the side or add them after grilling. Additionally, make sure your chicken isn’t too wet—pat it dry with paper towels if needed before mixing it with the aioli.
Can I use store-bought rotisserie chicken?
Yes, rotisserie chicken is actually one of the best options for this recipe! It’s already cooked and seasoned, which saves time and adds extra flavor. One rotisserie chicken typically yields about 3-4 cups of shredded meat, so you’ll have plenty for this recipe with some left over for other meals.
How do I keep the wraps from falling apart when I flip them?
Make sure you’re rolling them tightly enough and placing them seam-side down first in the pan. The heat will seal the seam naturally. Also, don’t try to flip them too early—wait until the bottom is properly golden and crispy, which helps hold everything together. Using a wide spatula and supporting the wrap as you flip will prevent accidents.
Are these wraps kid-friendly?
Definitely! Kids love the cheesy, familiar flavors in these wraps. If your children are picky eaters, you can adjust the garlic level in the aioli or use plain mayonnaise instead. You can also let kids help assemble their own wraps, which often encourages them to eat more enthusiastically.
Can I add vegetables to the filling?
Of course! Finely diced bell peppers, sautéed onions, or fresh spinach all work well inside the wrap. Just make sure any vegetables you add are relatively dry to prevent sogginess. Roasted vegetables work particularly well since roasting removes excess moisture and concentrates their flavors.