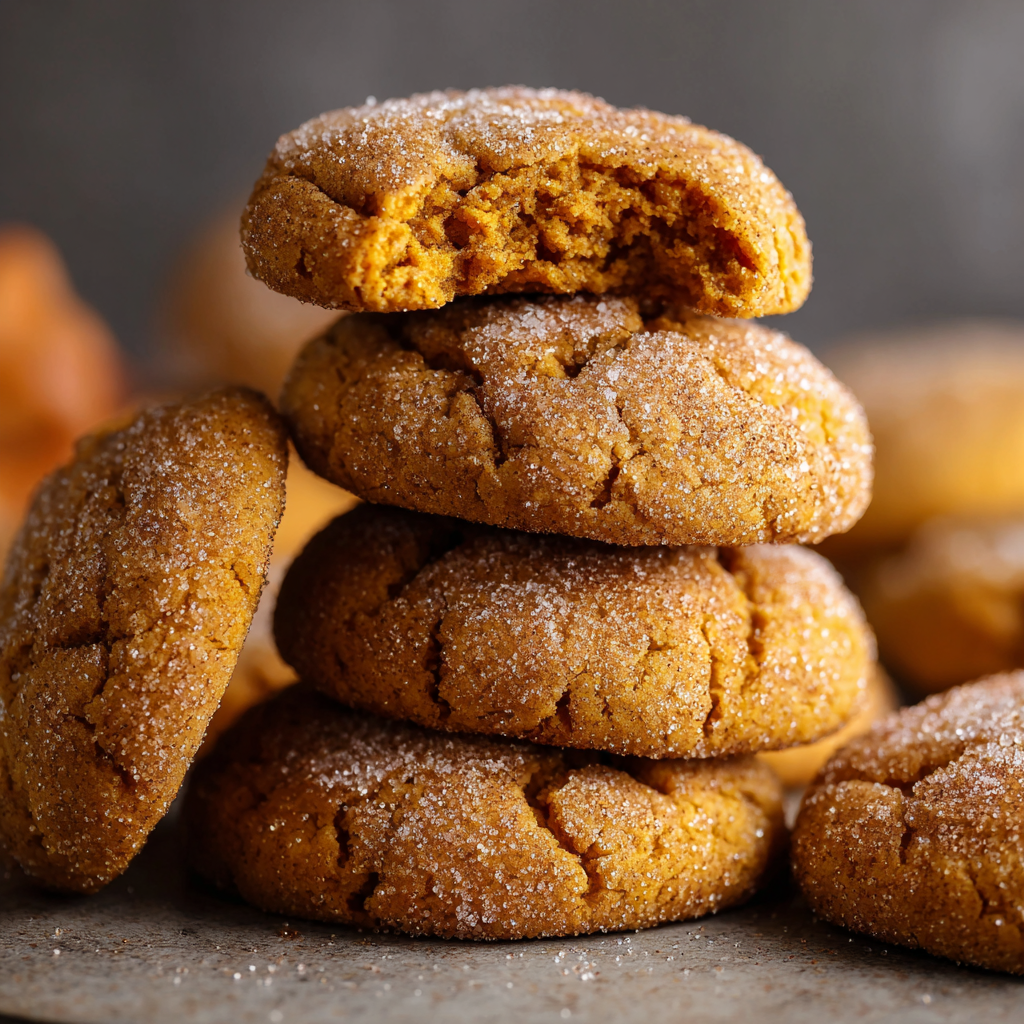
There’s something magical about the first bite of a pumpkin spice cookie that instantly transports me back to autumn afternoons in my grandmother’s kitchen. She’d always bake a double batch—one for the family and one for the neighbors—and the warm, spiced aroma would fill every corner of the house. These soft, pillowy cookies capture that same cozy feeling, with their perfectly balanced spices and tender crumb that practically melts in your mouth.
What makes these cookies truly special is their incredible texture. Unlike many pumpkin cookies that can be cakey or dense, these beauties strike the perfect balance between soft and chewy. Additionally, the cinnamon-sugar coating adds a delightful crunch that contrasts beautifully with the tender interior.
Why You’ll Love This Recipe
Perfectly Soft Texture: The combination of pumpkin puree and the right balance of leavening agents creates cookies that stay wonderfully soft for days. Meanwhile, the cream of tartar works its magic to give these cookies their signature tender crumb.
Warm Spice Flavor: Instead of relying on pre-mixed pumpkin pie spice, this recipe uses individual spices that you can adjust to your taste. The blend of cinnamon, nutmeg, and cloves creates a warm, complex flavor that’s never overwhelming.
Make-Ahead Friendly: The dough actually benefits from chilling, which means you can prepare it up to two days in advance. This makes them perfect for holiday baking or when you’re hosting guests.
Crowd-Pleaser: These cookies appeal to everyone, from pumpkin spice enthusiasts to those who typically shy away from seasonal treats. Furthermore, they’re substantial enough to feel satisfying without being too heavy.
Ingredients You’ll Need
For the Dry Mixture:
- 2 1/2 cups all-purpose flour, spooned and leveled
- 2 tsp cornstarch
- 1/2 tsp cream of tartar
- 3/4 tsp baking soda
- 1/4 tsp salt
- 2 tsp ground cinnamon
- 1/2 tsp ground nutmeg
- 1/8 tsp ground cloves
For the Wet Mixture:
- 3/4 cup unsalted butter, at room temperature
- 3/4 cup packed light brown sugar
- 1/2 cup white sugar
- 1 large egg
- 2 tsp pure vanilla extract
- 1/2 cup plain canned pumpkin (not pumpkin pie blend)
For the Cinnamon-Sugar Coating:
- 1/4 cup white sugar
- 1 1/2 tsp ground cinnamon
Ingredient Notes:
Pumpkin Puree: Make sure you’re using plain pumpkin puree, not pumpkin pie filling. The pie filling contains added sugars and spices that will throw off the recipe’s balance. Look for a can that lists only pumpkin as the ingredient.
Butter Temperature: Room temperature butter is crucial for achieving the right texture. It should be soft enough to leave an indent when pressed but not greasy or melted. Leave it out for about 45 minutes before baking.
Measuring Flour: Spoon the flour into your measuring cup and level it off with a knife rather than scooping directly from the bag. This prevents packing and ensures you don’t add too much flour, which would make the cookies dry.
Step-by-Step Instructions
Step 1: Mix the Dry Ingredients
Ingredients for this step:
- 2 1/2 cups all-purpose flour, spooned and leveled
- 2 tsp cornstarch
- 1/2 tsp cream of tartar
- 3/4 tsp baking soda
- 1/4 tsp salt
- 2 tsp ground cinnamon
- 1/2 tsp ground nutmeg
- 1/8 tsp ground cloves
Begin by gathering a medium bowl and your whisk. Combine the all-purpose flour, cornstarch, cream of tartar, baking soda, and salt in the bowl. Next, add the ground cinnamon, ground nutmeg, and ground cloves. Whisk everything together thoroughly until the spices are evenly distributed throughout the flour mixture—you shouldn’t see any streaks of spice.
Set this dry mixture aside for now. It’s ready and waiting for when you need it in Step 3.
Step 2: Cream Butter and Sugars
Ingredients for this step:
- 3/4 cup unsalted butter, at room temperature
- 3/4 cup packed light brown sugar
- 1/2 cup white sugar
- 1 large egg
- 2 tsp pure vanilla extract
- 1/2 cup plain canned pumpkin (not pumpkin pie blend)
Grab a large mixing bowl and add your room temperature unsalted butter, packed light brown sugar, and white sugar. Using an electric mixer on medium-high speed, beat these ingredients together for about 3-4 minutes. The mixture should become noticeably lighter in color and fluffy in texture—this process incorporates air, which helps create tender cookies.
Once fluffy, reduce your mixer speed to low. Add the egg and beat until fully incorporated. Then, pour in the pure vanilla extract and add the canned pumpkin. Continue beating on low speed until everything is well combined and the mixture looks smooth.
Here’s a tip: I like to beat for an extra 30 seconds at this stage to ensure the pumpkin is completely integrated into the butter mixture. This helps create an ultra-soft, moist dough.
Step 3: Combine Wet and Dry Ingredients; Chill Dough
Ingredients for this step:
- Dry mixture from Step 1
- Wet mixture from Step 2
With your mixer still on low speed, gradually add the dry mixture from Step 1 to the wet mixture in your large bowl. Add it in three or four additions rather than all at once—this prevents flour clouds and ensures even mixing. Continue mixing until a very sticky, soft dough forms. Don’t worry about the stickiness; that’s exactly what you want!
Cover the bowl tightly with plastic wrap or clingfilm, pressing it directly onto the surface of the dough if possible to prevent a skin from forming. Transfer the covered bowl to the refrigerator and let it chill for at least 2 hours. However, if you have time, chilling overnight produces even better results.
Why Chilling Matters
The chilling process serves multiple purposes. First, it allows the flour to fully hydrate, which improves the texture. Second, it firms up the butter, preventing the cookies from spreading too thin during baking. Finally, it gives the flavors time to meld together, resulting in a more cohesive, well-rounded taste.
Step 4: Prepare for Baking and Make Cinnamon Sugar Coating
Ingredients for this step:
- 1/4 cup white sugar
- 1 1/2 tsp ground cinnamon
When you’re ready to bake, preheat your oven to 350°F (175°C). While the oven heats, line two large cookie trays with parchment paper or silicone baking mats. Either option works well, though I slightly prefer silicone mats for their reusability.
In a small bowl, whisk together the white sugar and ground cinnamon until the cinnamon is evenly distributed throughout the sugar. This coating will give your cookies that signature sparkle and extra layer of warm spice flavor.
Step 5: Shape and Coat the Cookies
Ingredients for this step:
- Chilled dough from Step 3
- Cinnamon sugar mixture from Step 4
Remove your chilled dough from the refrigerator. Using a cookie scoop or spoon, portion out balls of dough that are approximately 1.5 tablespoons each. If you want uniform cookies, a medium cookie scoop (about 1.5 tablespoons) works perfectly for this.
Roll each portion between your palms to form smooth balls. Then, roll each ball generously in the cinnamon sugar coating, making sure it’s completely covered. After coating, gently flatten each ball slightly with your palm—don’t press too hard, just enough to create a disc shape about 3/4 inch thick.
Arrange the shaped cookies on your prepared baking trays, leaving about 2 inches of space between each cookie. They’ll spread slightly during baking, so proper spacing prevents them from merging together.
Step 6: Bake the Cookies
Place your trays in the preheated oven and bake for 8-10 minutes. The cookies are ready when the tops look just set but still appear slightly underdone in the center. They might even look a bit puffy. Don’t worry—they’ll continue cooking on the hot tray after you remove them from the oven, and they’ll settle as they cool.
Let the cookies rest on the baking trays for about 5 minutes after removing them from the oven. This cooling time allows them to firm up just enough to transfer without breaking. After 5 minutes, use a spatula to carefully move them to a wire cooling rack to cool completely.
Serving Suggestions
These pumpkin spice cookies are incredibly versatile when it comes to serving. Enjoy them warm from the oven with a cold glass of milk for the ultimate comfort treat. The contrast between the warm, spiced cookie and cold milk is absolutely heavenly.
For a more indulgent dessert, try sandwiching two cookies together with cream cheese frosting or even a scoop of vanilla ice cream. The tangy cream cheese pairs wonderfully with the warm spices, creating a flavor combination that’s hard to resist.
Perfect Pairings
These cookies shine alongside your favorite hot beverage. A pumpkin spice latte is an obvious (but delicious) choice, while chai tea offers complementary spices without being redundant. Hot apple cider is another fantastic pairing that celebrates autumn flavors.
Consider serving these cookies as part of a fall dessert spread alongside apple crisp, pecan pie bars, or caramel brownies. They’re substantial enough to stand on their own but also play well with others on a dessert table.
Recipe Variations
Cream Cheese Filled Cookies
Create a surprise center by making cream cheese filling. Beat together 4 oz softened cream cheese, 1/4 cup powdered sugar, and 1/2 tsp vanilla. Wrap cookie dough around a frozen ball of this filling before coating in cinnamon sugar. Bake as directed, adding 1-2 extra minutes if needed.
Maple Glazed Version
Replace the cinnamon-sugar coating with a maple glaze. Whisk together 1 cup powdered sugar, 2 tablespoons pure maple syrup, and 1-2 tablespoons milk until smooth. Drizzle over cooled cookies and let set.
Chocolate Chip Addition
Fold 3/4 cup mini chocolate chips into the dough after combining wet and dry ingredients. The chocolate adds richness without overwhelming the pumpkin flavor. Dark chocolate chips work especially well here.
Spiced Cream Cheese Frosting
Top cooled cookies with cream cheese frosting spiced with extra cinnamon and nutmeg. Beat 4 oz cream cheese with 2 tablespoons butter, 1 cup powdered sugar, 1/2 tsp cinnamon, and 1/4 tsp nutmeg until fluffy.
Pumpkin Spice Sandwich Cookies
Make smaller cookies (about 1 tablespoon of dough each) and sandwich pairs together with either vanilla buttercream, cream cheese frosting, or even Nutella for a different twist.
Make-Ahead Tips
The beauty of these cookies lies in their flexibility for advance preparation. The dough can be made up to 2 days ahead and kept covered in the refrigerator. In fact, I often prefer making the dough the day before I plan to bake—the extended chill time actually improves both flavor and texture.
Freezing the Dough
For longer storage, this dough freezes beautifully. Shape the chilled dough into balls and freeze them on a baking sheet until solid (about 2 hours). Once frozen, transfer the dough balls to a freezer-safe bag or container, where they’ll keep for up to 3 months. When you’re ready to bake, simply coat the frozen dough balls in cinnamon sugar and bake directly from frozen, adding 1-2 extra minutes to the baking time.
Storing Baked Cookies
Fully baked cookies stay fresh in an airtight container at room temperature for up to 5 days. Place a piece of bread in the container with the cookies—it sounds odd, but the cookies will absorb moisture from the bread, keeping them soft and tender.
Alternatively, freeze baked cookies for up to 3 months. Layer them between sheets of parchment paper in an airtight container. Thaw at room temperature for about 30 minutes before serving, or warm frozen cookies in a 300°F oven for 5 minutes.
Notas (Important Notes)
Don’t Skip the Chilling: While it’s tempting to skip this step when you’re eager to bake, chilling is absolutely essential. Without it, your cookies will spread too much and lose their soft, pillowy texture. Trust me, the wait is worth it!
Oven Temperature Accuracy: Oven temperatures can vary significantly, so I recommend using an oven thermometer to ensure accuracy. If your oven runs hot, these cookies can overbake quickly, becoming dry instead of soft.
Underbake Slightly: These cookies continue baking on the hot tray after removal from the oven. Taking them out when they still look slightly underdone in the center ensures they stay soft. If you bake until they look completely done, they’ll end up too firm.
Pumpkin Puree Quality: The quality of your pumpkin puree matters. Some brands are more watery than others, which can affect the dough consistency. If your puree seems watery, place it in a fine-mesh strainer over a bowl for 10 minutes to remove excess liquid.
Room Temperature Ingredients: Besides the butter, make sure your egg is also at room temperature. Cold eggs can cause the butter to seize up, resulting in a less smooth dough. Simply place the egg in a bowl of warm water for 5 minutes if you forgot to take it out ahead of time.
Frequently Asked Questions
Can I use pumpkin pie spice instead of individual spices?
Absolutely! Replace the cinnamon, nutmeg, and cloves with 2 1/2 teaspoons of pumpkin pie spice. However, keep in mind that commercial pumpkin pie spice blends vary in their composition, so the flavor might be slightly different from the original recipe. I prefer using individual spices because it gives me more control over the flavor profile.
Why are my cookies spreading too much?
Excessive spreading usually happens when the dough isn’t chilled long enough or when the butter was too warm. Make sure your dough is thoroughly chilled (it should be firm to the touch) and that your butter was at proper room temperature—not melted or greasy—when you started. Additionally, check that you’re using the correct amount of flour by measuring properly with the spoon-and-level method.
Can I make these cookies gluten-free?
Yes, but you’ll need to use a good quality 1-to-1 gluten-free flour blend that contains xanthan gum. I’ve had success with Bob’s Red Mill 1-to-1 Baking Flour. The texture will be slightly different—a bit more tender and crumbly—but still delicious. You may need to chill the dough a bit longer (3 hours instead of 2).
My dough seems too sticky. What should I do?
The dough is naturally quite sticky, which is normal and leads to soft cookies. However, if it seems excessively sticky and difficult to work with even after chilling, you can add 1-2 tablespoons more flour. Be conservative with additions, as too much flour will make the cookies dry. Another solution is to chill the dough longer or use a cookie scoop to portion it, which minimizes handling.
Can I use fresh pumpkin instead of canned?
While you can use fresh pumpkin puree, I actually don’t recommend it for this recipe. Fresh pumpkin tends to be more watery and less consistent than canned, which can affect the texture of your cookies. If you absolutely want to use fresh pumpkin, make sure to roast it, puree it very smoothly, and strain it through cheesecloth to remove excess moisture. Even then, the results may vary.
How do I know when the cookies are done?
These cookies are done when the edges are set and the centers still look slightly soft and puffy. They shouldn’t have any wet, raw-looking spots, but they also shouldn’t look dry or cracked. The tops will lose their glossy sheen and look more matte when they’re ready. Remember, they firm up significantly as they cool, so taking them out when they look slightly underdone is perfect.
Can I double this recipe?
Definitely! This recipe doubles beautifully. Just make sure you have a large enough bowl for mixing and adequate refrigerator space for chilling. You might want to chill the dough in two separate bowls for easier handling. When baking doubled batches, rotate your trays halfway through if you’re baking multiple sheets at once.
Why do some of my cookies crack while others don’t?
Slight cracking is actually normal and adds to the homemade charm of these cookies. However, excessive cracking usually means the dough is too dry. This can happen if you added too much flour, overbaked the cookies, or if your pumpkin puree was particularly thick. Try adding an extra tablespoon of pumpkin next time if this happens.